Okay, now that my computer is behaving itself....
If you've ever tried to capture a shot with a point and shoot digital camera where the main subject is off-center against a nice background (which you'd like included), then you probably know that sometimes that main subject is out of focus while the background is as sharp as a tack. The reason for that is because the camera's viewfinder was not positioned on the most important part of the composition, but was instead placed on the background on which it automatically focused.
You can remedy it in a safe, easy way by pointing at your main subject and taking the shot, but that will cut out some of that nice background you wanted to include. You can also step back a good deal more and take the picture from a distance and then crop it in your photo editing software, but that's not a good method either -- your capture will suffer.
So, that leaves pre-focusing your camera.
Point and shoot cameras have the handy capability of locking, or pre-locking, the focus at any point during the process of composing a photograph.
All it requires is first posing your subject were you'd like them in relation to the background -- usually off to one side or the other -- then focusing your camera directly onto the subject. When you're completely focused, press the shutter button halfway down and hold it there then move your camera into position to include the background elements you'd like. Then all you have to do is hold your camera as still as possible and press the shutter the rest of the way down.
That's all there is to it...mostly.
The actual act of posing, or positioning, your main subject is also an important aspect of digital photography. Some folks seem to have a natural knack for it, but others struggle for years to get it right. Trial and error can help with that, but for those who don't want to wait as they learn, there are ways to actively and immediately improve your compositions. A couple of my friends told me about a valuable and inexpensive resource called photography posing secrets that can be instantly downloaded from the web. I don't usually spend any money at all on my ventures, so I was skeptical, but from time to time I do come across something that's actually useful so I make a point of mentioning it publicly and I do believe this guide is immensely useful, plus it comes with 5 free bonuses.
When possible, I like to provide examples of the things I speak about here so below are some photos I took real quick to illustrate how utilizing the pre-focus feature of point and shoot digital cameras can save some of your shots. Not the best examples, but I think they show what I mean. I did not pre-focus on the first image and only the background leaves were in focus. I did pre-focus for the second image and the berry is much sharper and clearly in focus.
This example is out of focus.
This example is in focus.
That's it for today. Happy photographing, and good luck with all your main subject posing.
Thursday, May 8, 2008
How to Pre-Focus a Point and Shoot Camera, and Pose Your Subject
Thursday, April 24, 2008
Photoshop Enhanced Wasp (Bee)...and did I mention it's dead?
I don't really care for most insects, meaning I don't mind them so terribly much, but I don't want them on me or even very near me. Except for spiders...I'm terrified of all spiders to the point that it's a true phobia. And terror is not an exaggeration.
That said, we had a wasp problem here two summers ago and the result was that there were TONS of dead wasps lying around the screened porch and even in the house at various points during the season. With no car and a serious lack of subject matter, I started taking pictures of them, even posing them on occasion (lots and lots of hand-washing followed each session). I've sold a few of those photos but I still pull the originals out from time to time and play with them.
This morning I messed around with one of my favorites so I thought I'd share the results here.
As are all my photos these days, this was taken with a Samsung Digimax A50 point and shoot digital camera. Lots of post-camera processing turned an okay picture into one that I think is pretty great, and this is just one version of the same image.
Digital photography, and digital images in general are so much fun. Now that there is software as awesome as Adobe Photoshop CS3, all sorts of miracles can take place right on a computer screen. Digital photography will never be the same again!
Tuesday, April 22, 2008
Digital Photography Tips: Curves, Levels, Actions
I worked more with the daisy photo again today. Last time, I ran a few simple commands that lightened the photo, improved contrast, and slightly balanced the tone. The change wasn't drastic, but it brought the digital image to a point where it was ready to receive more enhancements.
Today I decided that I wanted to apply a deep, rich glow to the picture so I modified some steps in an Adobe Photoshop CS3 action that I downloaded some time ago. A Photoshop action is a recording of a series of commands in Photoshop. You simply record every step you take, save it, and then later play that recording any time you want those particular digital effects for your images and Photoshop will do all the work for you.
But, before I used the action, I decided that I wanted to further lighten the shadows in the daisy picture because the modified action would no doubt darken the image. I used the following Photoshop tips and tricks to achieve my objectives.
First I clicked, "create adjustment layer" from the layers palette as shown below to create two new adjustment layers.
My first choice was "curves" and I applied these settings.
Second, using the same "create adjustment layer" step, I made a new "levels" layer with these settings.
And here is the result of those two steps. It still looks pretty and is much lighter. It looks good enough to work with so I'll go ahead and flatten the layers before I continue.
Next, I loaded the action I wanted and clicked "play" on the action palette.
Here is the result.
As you can see, the digital image is considerably softer and the surrounding colors are rich and deep. Unfortunately, I lost some of the water droplet detail on the daisy itself, but with future experimentation, I might be able to avoid that. This is a perfect example of why you should never alter your original image…simply work from copies or utilize the "save as…" feature.
I like the way it looks a lot, but one of my idiosyncrasies is to create several different versions of the same photo. I decided to save a copy as it is in the photo above and then work with it further. I thought it would be pretty to wash out some of the color for a dreamy effect but try not to lose too much of the contrast at the same time.
I applied several different adjustment layers to achieve this result: a Hue/Saturation layer, a Curves layer, a Selective Color layer, and a Levels layer. And here's what it looks like now.
I like this a lot, but I lost even more detail in the daisy so I tried to recover some of that by using the lasso tool to select a tight circle of and around the daisy itself, feathering the selection to a value of 25, and then applying the following Brightness/Contrast settings.
Now, it's much better but my final step is to choose the "burn" tool with a soft brush and apply it only to the yellow center of the daisy with a setting of about 19% on the "shadows" range. I click that a few times and here's what I finished with.
I like that look so I'm all finished for today.
I made a recording of the steps I used after I modified the existing actions in case anyone wanted to play with them...this includes the final brightness/contrast adjustments and the burn tool adjustment. You can download the file with both actions at the link below.
DOWNLOAD HERE: Special Effects Actions
Or, if you'd like to go ahead and learn proven techniques on getting the most out of your simple digital camera: Click Here!
Later on, more fun and focus with digital photography, Photoshop tutorials, and Photoshop tips and tricks. Happy creating!
Friday, April 18, 2008
Digital Photography Tips, Basic Color Boost, Photoshop
If you can hold your digital point and shoot camera still and frame your shot the way you want, then you can probably compose a really nice photograph that needs little or no adjustment. But, why not make it better?
With some easy Adobe Photoshop CS3 digital photography tips, it's easy to take a good image and punch it up a little to turn it into a great image. Color and toning for instance: with just a couple small modifications in Photoshop you can improve both and bring your subject forward for improved clarity and contrast.
Below is a short Adobe Photoshop tutorial that I use (most of the time without modifying my steps) for almost every digital photograph I take. It improves color, toning, and contrast all at the same time.
This simple daisy photo was taken with a Samsung Digimax A50 digital camera. Obviously it's a point and shoot model.
First I applied the Unsharp Mask with these settings: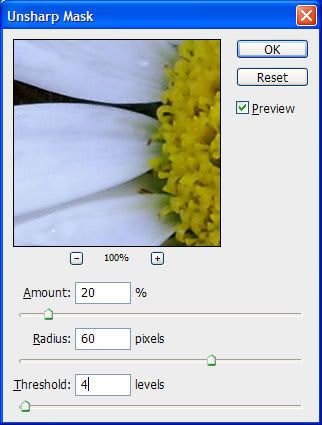 Next, I duplicated the background layer and set it to Screen mode like so:
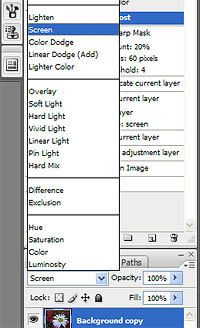
Then I set the opacity of the modified layer to 30% like so: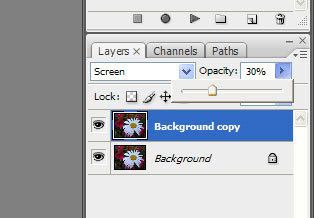
Next, I created a "Hue/Saturation adjustment layer" with the following settings: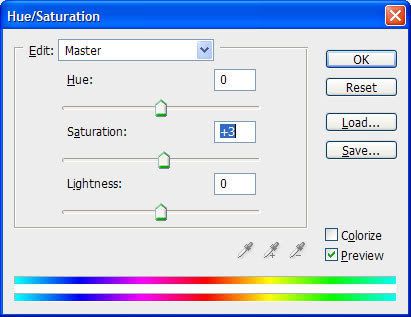
And finally, just flatten your image and you're done! Here is the final result: As you can see, the image has been lightened, contrast has been increased, and color tone/balance has been improved. The digital photograph is now ready for further enhancements, which can easily be done using Photoshop CS3.
Wednesday, April 16, 2008
Here are a Few of my Favorite Sites.....
As relates to digital photography, that is....
More to come later.
Tuesday, April 15, 2008
Point and Shoot Digital Cameras
Like most people with a healthy interest in digital photography, I'd love to have a slick new DSLR camera with which to capture the beautiful (or grotesque) things I see around me every day.
Unfortunately, I can't afford such a luxury so what I actually have is a pretty good point and shoot camera by Samsung. What I also have is Adobe Photoshop CS3. Put those two possessions together and I have a reasonable facsimile of a decent DSLR camera. Or so I like to tell myself.
In all honesty, I'm fairly happy with my little Samsung. It has five megapixels, is easy to use, and has given me several photos that I managed to sell or otherwise feature in a public venue. Coupled with Photoshop CS3, my camera has given me many, many hours of pure joy. It didn't happen automatically, of course, but with my constantly awake curiosity I was driven to find ways to produce beautiful or startling photographs because I knew it was going to be sometime before I would be able to buy a good DSLR camera.
First of all, I had to learn what my little camera could actually do. I fooled around with it fresh out of the box for a while but a few hideous photographs later, and I was forced to turn to my handy little owner's manual. I read it cover-to-cover, which I encourage all camera owners to do.
I learned some invaluable things, but not quite enough to produce the results I longed for. So, I turned to the web--that vast storehouse of infinite wisdom--and then I got excited.
Along with other un-camera-like things, this blog will speak about my experiences with my wee Samsung, with Photoshop, and with a few other totally invaluable pieces of software. I'll likely also share some of my photos. Next time: fun with focus lock and exposure lock.
Same time (probably not), same place, same voice!
