I worked more with the daisy photo again today. Last time, I ran a few simple commands that lightened the photo, improved contrast, and slightly balanced the tone. The change wasn't drastic, but it brought the digital image to a point where it was ready to receive more enhancements.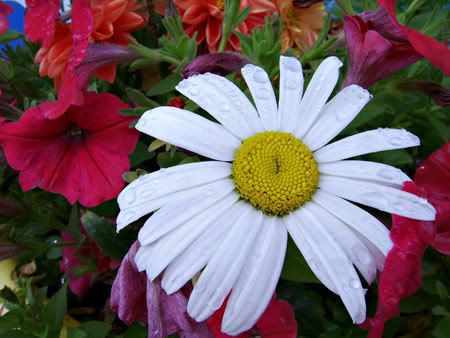
Today I decided that I wanted to apply a deep, rich glow to the picture so I modified some steps in an Adobe Photoshop CS3 action that I downloaded some time ago. A Photoshop action is a recording of a series of commands in Photoshop. You simply record every step you take, save it, and then later play that recording any time you want those particular digital effects for your images and Photoshop will do all the work for you.
But, before I used the action, I decided that I wanted to further lighten the shadows in the daisy picture because the modified action would no doubt darken the image. I used the following Photoshop tips and tricks to achieve my objectives.
First I clicked, "create adjustment layer" from the layers palette as shown below to create two new adjustment layers.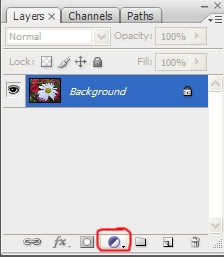
My first choice was "curves" and I applied these settings.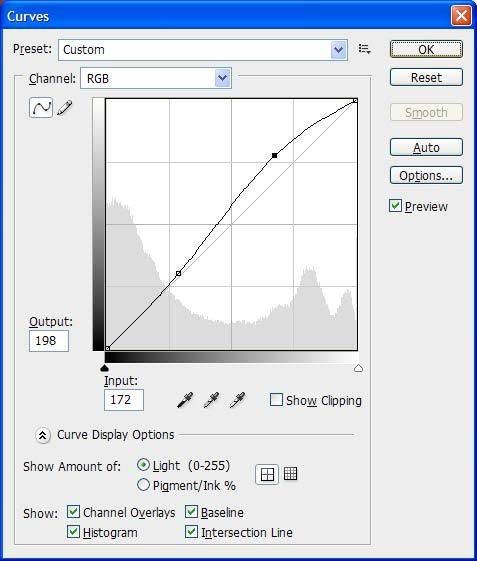
Second, using the same "create adjustment layer" step, I made a new "levels" layer with these settings.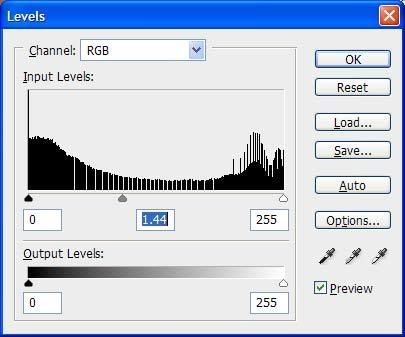
And here is the result of those two steps. It still looks pretty and is much lighter. It looks good enough to work with so I'll go ahead and flatten the layers before I continue.
Next, I loaded the action I wanted and clicked "play" on the action palette.
Here is the result.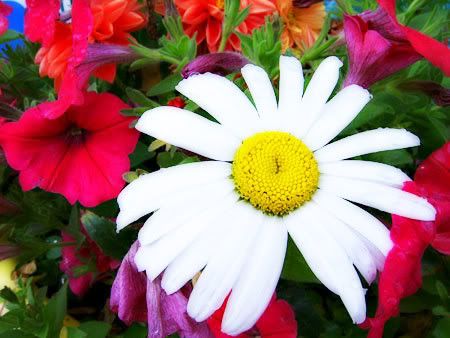
As you can see, the digital image is considerably softer and the surrounding colors are rich and deep. Unfortunately, I lost some of the water droplet detail on the daisy itself, but with future experimentation, I might be able to avoid that. This is a perfect example of why you should never alter your original image…simply work from copies or utilize the "save as…" feature.
I like the way it looks a lot, but one of my idiosyncrasies is to create several different versions of the same photo. I decided to save a copy as it is in the photo above and then work with it further. I thought it would be pretty to wash out some of the color for a dreamy effect but try not to lose too much of the contrast at the same time.
I applied several different adjustment layers to achieve this result: a Hue/Saturation layer, a Curves layer, a Selective Color layer, and a Levels layer. And here's what it looks like now.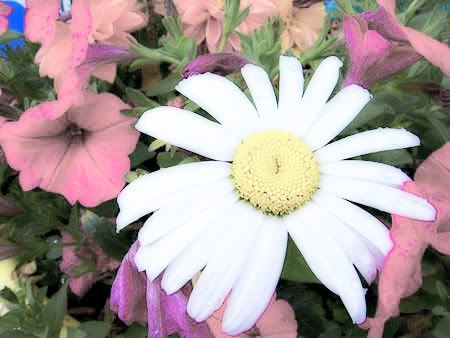
I like this a lot, but I lost even more detail in the daisy so I tried to recover some of that by using the lasso tool to select a tight circle of and around the daisy itself, feathering the selection to a value of 25, and then applying the following Brightness/Contrast settings.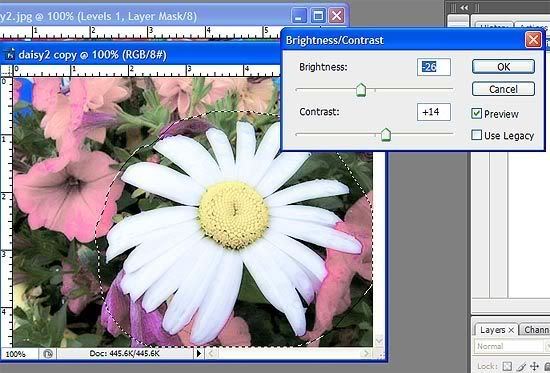
Now, it's much better but my final step is to choose the "burn" tool with a soft brush and apply it only to the yellow center of the daisy with a setting of about 19% on the "shadows" range. I click that a few times and here's what I finished with.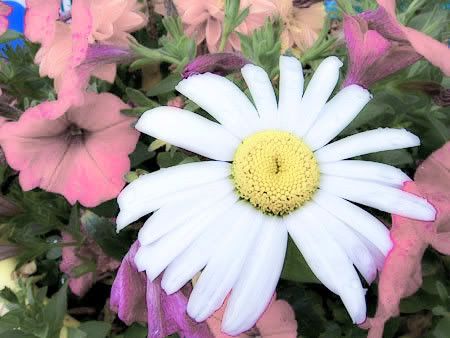
I like that look so I'm all finished for today.
I made a recording of the steps I used after I modified the existing actions in case anyone wanted to play with them...this includes the final brightness/contrast adjustments and the burn tool adjustment. You can download the file with both actions at the link below.
DOWNLOAD HERE: Special Effects Actions
Or, if you'd like to go ahead and learn proven techniques on getting the most out of your simple digital camera: Click Here!
Later on, more fun and focus with digital photography, Photoshop tutorials, and Photoshop tips and tricks. Happy creating!
Tuesday, April 22, 2008
Digital Photography Tips: Curves, Levels, Actions
Subscribe to:
Post Comments (Atom)
1 comment:
Very effective tips for digital photography...Thanks for sharing...
Post a Comment